
The card when opened reveals a hidden image.
The lovely Vannessa who is the Administrator and head honcho for the Inspiring Inkin' Challenge blog asked if we could use this card I'd demonstrated at our Quarterly Team Meeting so I thought I better post a tutorial on my blog. This is a long post - lots of pictures to make it easy for you to follow, so let's get started.
It goes without saying, you can use whatever colour combo or stamp set you wish, but these are the ones I used.
Supplies as follows:
Stamps: Love you Much
Inks: Whisper White Craft, Taken with Teal, Night of Navy and Regal Rose Classic Ink pads; Markers: Chocolate Chip, Real Red, Regal Rose, Always Artichoke and Night of Navy
Papers:
1 x 8" x 5 3/4" Taken with Teal card stock
1 x 2 1/2" x 5 3/4" Night of Navy card stock
2 x 3" x 2" Regal Rose card stock
Scrap piece of Whisper White large enough to stamp "Hugs & Kisses" image and punched out with a Scallop Circle PunchScrap piece of Whisper White large enough to stamp the "Love Birds" image and punched out with a 1 3/4" Circle Punch
Scrap piece of Regal Rose large enough to stamp "Hugs & Kisses"Scrap piece of Confetti White large enough to stamp "Love You Much" image
Accessories: Scallop Circle Punch, 1 3/8" Circle Punch, 3" square Post-it notes, 1/4" Night of Navy grosgrain ribbon, snips, adhesive, dimensionals, sponge daubers
Step 1
Take the 8" x 5 3/4" Taken with Teal card stock with the long edges at the top and bottom and score at 2" and 6". Fold along score lines to form a 5 3/4" x 4" gatefold card.
Step 2
You will need 2 Post-it notes 3" square size. Attach one of the Post-it note to a scrap piece of card stock and punch out a scallop circle. Discard the card stock portion and take the Post-it note with sticky half on the left to temporarily adhere to closed gatefold card as illustrated below. Next unfold gatefold, turn Scallop Circle Punch upside down and using the Post-it scallop circle as a guide, punch out a bite from the left hand side gatefold.

Step 3
Remove Post-it scallop circle from left gatefold and attach the sticky part to the gatefold on the right hand side. Punch out another bite using the Post-it scallop circle as a guide to position your punch while upside down.

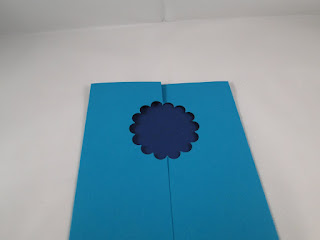
When card is closed, the two half bites make one whole scallop circle aperture.

Step 4
Take the 2 1/2" x 5 3/4" Night of Navy card stock which is what I call as the "Proscenium" and centre it on the middle panel of Taken with Teal base card. Make pencil marks to mark position. Apply temporary adhesive and temporarily adhere to base card.

Step 5
Close the card.
Step 6
Adhere second Post-it note to a scrap piece of card stock and punch out a 1 3/8" circle. Discard the card stock, but use the 1 3/8" Post-it note circle to temporarily adhere to centre of scallop circle aperture in the picture below this one.

After attaching the 1 3/8" Post-it circle to the Proscenium, turn 1 3/8" Circle Punch upside down and use the attached 1 3/8" Post-it circle as a guide to punch out a 1 3/8" aperture on the Night of Navy Proscenium (not pictured) then set aside.

Step 7
Stamp the "Trio of Hearts" image with Whisper White Craft ink on the front panel gatefolds

as well as the inside of the gatefold panels (see below).

Step 8
Take the 2 pieces of 2 1/2" x 3" Regal Rose card stock and score 1/2" from 1 edge and apply sticky strip next to the 1/2" score line as illustrated below - it is important you butt it accurately along this score line. Apply sticky strip on the reverse side of the Proscenium also. Set aside the Proscenium.
Now flip both pieces of Regal Rose over with sticky strip side down for the next step.

Step 9
Draw a pencil line horizontally from left to right 1" down from top edge. Measure 1" in from top and bottom edges (this is exactly 1/2 of the width of your card stock) and also draw a vertical line as shown below. Where the lines intersect, cut diagonally from top right and bottom right corners. Repeat mirror image on the second piece of Regal Rose card stock. Set aside.

Step 10
Ink the "birds" image stamp with Chocolate Chip and Real Red markers and stamp on scrap piece of Whisper White card stock. Turn 1 3/4" circle punch upside down, centre over your stamped image and punch out the birds as illustrated below.

Step 11
Centre the stamped bird image underneath the scallop circle aperture and adhere to middle panel of card base as shown here.

Step 12
Take the piece of Regal Rose with its 1/2" score line on the right and with the sticky strip facing up, butt it to the inside of the 6" score line of card base, ensuring it covers the bird image as depicted below.

Repeat for opposite side. This time the 1/2" score line is on the left and butts up to the 2" score line and overlaps the other piece of Regal Rose card stock as shown below.

Step 13
You are now ready to adhere the Proscenium - the Night of Navy piece. Remove protective film on sticky strip and adhere Proscenium between the pencil marks you made earlier in Step 4. Remove sticky strip protective film on Regal Rose tab on the right hand side. Close card on one side as shown below. Press firmly to adhere Regal Rose tab to right gatefold.

Step 14
Repeat for the opposite side, close card to adhere Regal Rose tab to left gatefold as shown here.

This essentially is where the magic begins! When you open the card, the gatefold pulls back the tabs like drawing back a curtain on your stamped bird image (see below)

Step 15
Ink the "Love" stamp with Night of Navy, Always Artichoke and Regal Rose Stampin' Write Markers and stamp on to Confetti White card stock. Sponge edges with Night of Navy classic ink pad. I used Confetti White so that it gives you the option to watercolour the "V" the inside of the letters using heavier weight card stock.

Step 16
Apply adhesive to the stamped "Love" image and adhere at the bottom of the Proscenium below the 1 3/8" circle aperture as illustrated below.
 Step 17
 Almost there! Ink scallop circle image "Hugs & Kisses" with Taken with Teal and stamp on Whisper White card stock, and stamp another in Regal Rose on Regal Rose card stock. Punch out the Taken with Teal on Whisper White with scallop circle punch. On the Regal Rose image, cut out the heart and adhere it with a dimensional over the heart in the Taken with Teal image.

Step 18
Lastly, attach a piece of 1/4" Night of Navy grosgrain ribbon to the back of the stamped Taken with Teal "Hugs & Kisses" scallop circle, raise it on dimensionals and adhere to bottom right of the front of the right gatefold panel.
Ta Da! Big Fan Fare! Your finished card! It really isn't difficult once you know how!
The content of this tutorial and artwork is shared for your personal enjoyment and inspiration and is not intended for reproducing in any way, shape or form for submisson to contests, publication or personal monetary gain. I'd respectfully ask that you provide a link to my blog instead.
Happy Stamping!


 After attaching the 1 3/8" Post-it circle to the Proscenium, turn 1 3/8" Circle Punch upside down and use the attached 1 3/8" Post-it circle as a guide to punch out a 1 3/8" aperture on the Night of Navy Proscenium (not pictured) then set aside.


 Step 17

